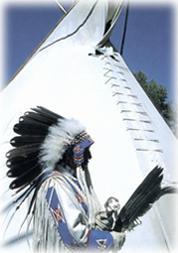
 All
about teepee
All
about teepeehistory, construction, our products - teepee from CONDOR.
Visit our teepee photo gallery!
History
 Let's start with a few words on the history of
tipi. These inhabitable tents of conical shape were used by many natural folks - from the North of Scandinavia
(the Laplanders), through the northern areas of contemporary Russia
(the Nyenyens, the Chukchs and many others) to the North of America and Greenland
(the Inuits). This basic construction had spread accross the prairies of Northern America where it naturalized and was brought to
perfection. This also is where current Czech name for the tent -
"týpí" (English "tipi", "tepee" or
"teepee") - comes from. Originally smaller hide tents
(up to 4 metres high), made by hunters and cultivators, started to grow bigger as horses - that were able to carry heavier loads - started to be
employed. Lost horses of Spanish conquerors, who had invaded
Mexico, naturalized soon and multiplied in the prairies - and the Indians made the best of this
"white man's gift". Tents grew gradually up to 7 metres of height and their construction became really
elaborate. The weight of the tent and its poles was no more limited by physical strength of humans and the Indians turned into hunters migrating over huge areas of
land. Details of the tipi construction and shapes of the tents differed in various
areas, but the structure and the elementary construction itself were the same - from the North of Mexico to the South of
Canada. In the half of the 19th century the hide was replaced by canvas - introduction of canvas was a historical milestone in tipi
development. (Number of bisons decreased while the numbers of white tradesmen offering canvas started to
grow.) Tent made of canvas was much lighter but its production was more
demanding. The biggest "assembly" tents had up to 8 metres and their size was not limited by weight anymore but by the length of
poles. After the Indians were concentrated in reservations, the tipi lost its original importance as a mobile dwelling
/habitation, home/ - today, it merely is a folkloric phenomenon.
Let's start with a few words on the history of
tipi. These inhabitable tents of conical shape were used by many natural folks - from the North of Scandinavia
(the Laplanders), through the northern areas of contemporary Russia
(the Nyenyens, the Chukchs and many others) to the North of America and Greenland
(the Inuits). This basic construction had spread accross the prairies of Northern America where it naturalized and was brought to
perfection. This also is where current Czech name for the tent -
"týpí" (English "tipi", "tepee" or
"teepee") - comes from. Originally smaller hide tents
(up to 4 metres high), made by hunters and cultivators, started to grow bigger as horses - that were able to carry heavier loads - started to be
employed. Lost horses of Spanish conquerors, who had invaded
Mexico, naturalized soon and multiplied in the prairies - and the Indians made the best of this
"white man's gift". Tents grew gradually up to 7 metres of height and their construction became really
elaborate. The weight of the tent and its poles was no more limited by physical strength of humans and the Indians turned into hunters migrating over huge areas of
land. Details of the tipi construction and shapes of the tents differed in various
areas, but the structure and the elementary construction itself were the same - from the North of Mexico to the South of
Canada. In the half of the 19th century the hide was replaced by canvas - introduction of canvas was a historical milestone in tipi
development. (Number of bisons decreased while the numbers of white tradesmen offering canvas started to
grow.) Tent made of canvas was much lighter but its production was more
demanding. The biggest "assembly" tents had up to 8 metres and their size was not limited by weight anymore but by the length of
poles. After the Indians were concentrated in reservations, the tipi lost its original importance as a mobile dwelling
/habitation, home/ - today, it merely is a folkloric phenomenon.

Construction of the Tipi
 Tipi cover is basically a
half-circle shape. It is scrolled into a cone, backed from inside by the pole
construction. The cover has a
hanger, smoke flaps, holes for the lacing pins and a
door hole on and in
it. Most tipi covers have
two wedges in their upper parts to better embrace the bundle of poles
(the wedges make it easier to stretch the cover and there is much lower risk of the canvas
ripping). In the Czech Republic, there are two types of tipi construction competing -
"Dakota" and "Seton".
The shape called "Dakota" is derived from R. Laubin's description of tipis - it roughly corresponds with the tent shapes of the Dakota
tribes. Centre of the drawn circle lies off the middle of the
cover, approximately on the level of the peaks of the smoke
flaps. The tipi, when erected, looks a bit like "sitting on its
bottom". The "Seton" type is taken from a description made by a famous collector of Indian
traditions, trapper and writer, E. T. Seton. In this case, the centre of the drawn circle lies just in the middle of the
cover, at the hanger, which means the tipi is centrally
symmetrical. Radius of the circle roughly matches diameter of the
tent, so it's often reffered to as the "size" of a
tipi. These differences in shape are of almost no practical
significance. Slight shape differences could have been found even within one tribe and were caused
e.g. by the actual size of the bison hides used to make the
cover, or by the actual level of laziness of each Indian's wives who might have refused to laboriously extend the hides at the outer edges of the
tent. Under our conditions, it is probably more practical to use the
"Seton" type tipi - it is easier to erect (as it has a symmetrical skeleton) and its inner space is by about 30 cm bigger when compared to a Dakota tent of the same
radius. All what has been just said explains that slight differences in shapes and
sizes, detectable in tents made by different tipi producers, are normal and do not indicate that one tipi is more and the other less
"genuine". What can - and should be - compared is the quality of
make: e.g. the way the lower edging is made and underlaid, quality and
seaming of the holes for the lacing pins, location and spacing
(up to 25 cm) of these holes, reinforcing of the hanger and of the cornets at the end of the smoke
flaps, insertion of a wedge to the upper part of the flaps, and the way
all the seams are done and neatened.
Tipi cover is basically a
half-circle shape. It is scrolled into a cone, backed from inside by the pole
construction. The cover has a
hanger, smoke flaps, holes for the lacing pins and a
door hole on and in
it. Most tipi covers have
two wedges in their upper parts to better embrace the bundle of poles
(the wedges make it easier to stretch the cover and there is much lower risk of the canvas
ripping). In the Czech Republic, there are two types of tipi construction competing -
"Dakota" and "Seton".
The shape called "Dakota" is derived from R. Laubin's description of tipis - it roughly corresponds with the tent shapes of the Dakota
tribes. Centre of the drawn circle lies off the middle of the
cover, approximately on the level of the peaks of the smoke
flaps. The tipi, when erected, looks a bit like "sitting on its
bottom". The "Seton" type is taken from a description made by a famous collector of Indian
traditions, trapper and writer, E. T. Seton. In this case, the centre of the drawn circle lies just in the middle of the
cover, at the hanger, which means the tipi is centrally
symmetrical. Radius of the circle roughly matches diameter of the
tent, so it's often reffered to as the "size" of a
tipi. These differences in shape are of almost no practical
significance. Slight shape differences could have been found even within one tribe and were caused
e.g. by the actual size of the bison hides used to make the
cover, or by the actual level of laziness of each Indian's wives who might have refused to laboriously extend the hides at the outer edges of the
tent. Under our conditions, it is probably more practical to use the
"Seton" type tipi - it is easier to erect (as it has a symmetrical skeleton) and its inner space is by about 30 cm bigger when compared to a Dakota tent of the same
radius. All what has been just said explains that slight differences in shapes and
sizes, detectable in tents made by different tipi producers, are normal and do not indicate that one tipi is more and the other less
"genuine". What can - and should be - compared is the quality of
make: e.g. the way the lower edging is made and underlaid, quality and
seaming of the holes for the lacing pins, location and spacing
(up to 25 cm) of these holes, reinforcing of the hanger and of the cornets at the end of the smoke
flaps, insertion of a wedge to the upper part of the flaps, and the way
all the seams are done and neatened.
Poles, stakes, lacing pins
Poles should be long, thin, light, solid, smooth and - of course -
natural. In our woods, spruce is the most suitable tree. In an
emergency, also pine (heavier, more fragile and crooked) or some deciduous trees can be
used. In a dense new forest the trees grow fast and high in their hunt for more
light. The tiniest of them are going to be snipped anyway - and these are just ideal for constructing the tipi skeleton. The forester will definitely tell us where to find such trees and will charge for them - in most cases - just as for mere fuel
wood. The poles should be about 1 meter longer than the radius of the
tipi, minimum diameter (thickness) of the poles in their uppermost part is cca 2 cm. Thin poles are the best - diameter in the lowermost part of the poles should be about 10 cm. The poles are to be peeled of
bark, with branch knots smoothed out.
We need cca 11-20 poles, depending on the size of tipi and number of suitable spruces
available. We can make following approximate recommendation: 11 poles for tipis up to 5 metres; at least 11, better 14 poles for a 6 m
tipi; and 3 more poles for tipis the size of which exceeds 6 metres. To make transportation
easier, we can use poles consisting of several parts.
Stakes (pegs) are made of wood - they're about 20-40 cm long and cca 2-4 cm
thick. Lacing pins are made of wooden rods; the pins are about 20 cm long and up to 1 cm
thick. It's preferable to peel and smoothen the pins and taper them at one end (cca 5 mm in
diameter).
Locating and constructing the Tipi
 We should find a
flat, dry and sunny place for erecting our tipi. Then we have to choose the direction the doorway is going to
face. The Indians, driven by religious reasons, used to orientate their tents to the East or
Southeast. Thanks to this orientation, with prevailing western
winds, tipis were exhausting smoke efficiently. We mostly have northwestern winds
(or northeastern winds from time to time) in the Czech Republic, so the doorway should ideally face the South or
Southeast.
We should find a
flat, dry and sunny place for erecting our tipi. Then we have to choose the direction the doorway is going to
face. The Indians, driven by religious reasons, used to orientate their tents to the East or
Southeast. Thanks to this orientation, with prevailing western
winds, tipis were exhausting smoke efficiently. We mostly have northwestern winds
(or northeastern winds from time to time) in the Czech Republic, so the doorway should ideally face the South or
Southeast.
At first, we have to unfold and spread the cover (beside the place where it is eventually going to
stand) and
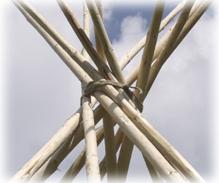
place the three strongest (thickest) poles onto it. The
lower ends of the poles should exceed the edge of the cover by about 10
cm. We mark the point where the poles touch the hanger and lash
them together - thoroughly but losely - with a clothes-line or a strong hempen
string. One end of the string - as long as one of the poles - is left
untied.
The poles are then raised and the legs of the tripod
extended. One pole is placed against the doorway, the other two on the
sides. The remaining poles are then gradually, in due order, laid upon this base - forming a regular spindle in the area where they lean against one
another. On the rear side of the construction, one pole is to be skipped
(left out) - the cover is later lashed to this last pole and placed in
position. At the intersection, the poles are wrapped round several times by the loose end of the string - the end is then tied to one of the
poles. The lower ends of the poles should be closer together at this
stage. Now, we
lash the cover's hanger to the last ("lifting")
pole. We roll the cover closer to the
pole, raise it - after the pole is in position, we draw the cover around the construction
("frame") and
pin it together between the door poles with the lacing pins. Pinning is to begin from the top. We then shove the poles out until the cover is
taut. It is quite likely that the edge of the cover doesn't have
equal distance from the ground at all the poles
(ideal distance is about 5-10 cm from the ground; close contact with the ground means the canvas is exposed to too much moisture and can be
damaged). The distance, however, can be adjusted quite easily. The lifting pole and the poles of the tripod just have to be slightly em bedded to the ground
(or, conversely, propped up, if necessary). The other poles are then easy to shift and adjust
(just wag them if they resist being moved). The bottom of the cover is then fastened to the ground by the wooden stakes
(pegs).
Round stones or marbles, tied to the lower
edge, are often recommended as "stylish" - they,
however, decrease the durability ("life") of the canvas
cover. It is much better to use
short and strong grommets for ropes - it is the rope that is fastened to the stake
(peg) and its advantage is it's easily replacable. The marbles or grommets should be about 70 cm
apart. Now we have to
stretch the smoke flaps using the cords
("control ropes") and the last two poles (long poles on either side of the outside of the
tipi). The final step is to
hang the door flap over the
doorway.
bedded to the ground
(or, conversely, propped up, if necessary). The other poles are then easy to shift and adjust
(just wag them if they resist being moved). The bottom of the cover is then fastened to the ground by the wooden stakes
(pegs).
Round stones or marbles, tied to the lower
edge, are often recommended as "stylish" - they,
however, decrease the durability ("life") of the canvas
cover. It is much better to use
short and strong grommets for ropes - it is the rope that is fastened to the stake
(peg) and its advantage is it's easily replacable. The marbles or grommets should be about 70 cm
apart. Now we have to
stretch the smoke flaps using the cords
("control ropes") and the last two poles (long poles on either side of the outside of the
tipi). The final step is to
hang the door flap over the
doorway.
Tipi accessories
Even a "bare" tipi can easily be used, but if you want to dwell in it comfortably and for a longer period of
time, you should have two essential accessories: the liner ("double
wall", "inner wall", sometimes also called the
"dew cover") and a "hat" ("cap" - a conic cover protecting the upper ends of poles from
rain).
The Liner
The liner is the inner wall tied inside the poles cca 1,5-2 metres above the
ground. The
space between the cover and the liner ducts fresh air in and exhausts smoke
up. It also keeps bedding dry in a storm (water is not dripping from the poles - just off centre, of
course) and helps to maintain acceptable temperature inside the tent when the weather is
cold.
The bottom part of the liner touches the ground or even lies on the ground
(it is thus practical to make the lower part of the liner from a
heavy-duty moisture-resistant material - this will greatly extend its
life).
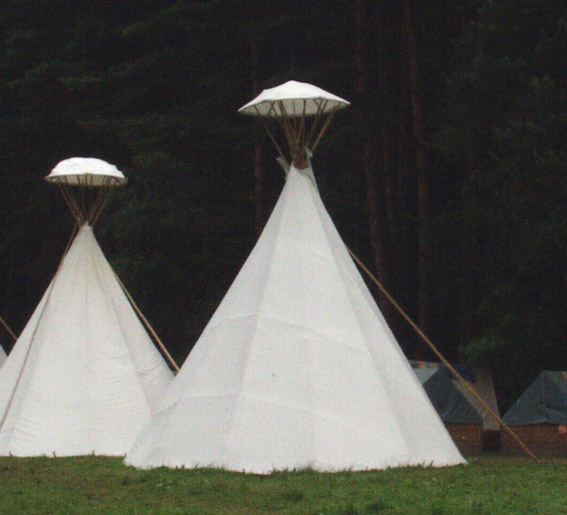
The Hat (Cap)
The hat is a round bulging cover, having about 1,5 m in diameter, which covers the top of the construction (pole
framework) and prevents water from running down the poles to the inside of the tent during heavy
rains.
The hat is braced with hazel tree rods and placed onto the tops of the
poles; three ropes, fastened to the bottom parts of poles, secure the hat in
position. Some books denounce the hats as "not used much by the
Indians" and "unsightly". Nevertheless, the hats proved to be utmost
practical, especially when used on summer camps for children.
Fireplace in the Tipi
The fireplace is placed almost in the center of the tent (just under the opening between the smoke
flaps). It usually is about 15 cm deep and is flanked by stones. Dry hardwood is the best wood to be burned
(it does neither smoke, nor crackle too much and is calorific). Pine wood is also
suitable, spruce wood less so. Lops can be burned with utmost circumspection only - just a handful to ignite the fire or to light up the tent
shortly. It is surprising how even a small fire can heat up the
tent. After some hours of heating, the glowing ashes can be piled up in the centre of the fireplace - this maintains moderate heating through the whole
night.
The fireplace can be also used for cooking. Traditional shanks and tripods can be replaced by a
cord, hanging from the top of the tent to above the centre of the
fireplace. The cord has a firm loop knot ("hangman's knot") at its
end, with a hook for the pot (thanks to the knot you can adjust the position of the pot). We can cook using the flames
directly, or "savingly" i.e. just by slowly circling the pot round the
fire. Handling the pot is really easy. And after you finish your
cooking, you just fasten the rope to one of the poles.
Smoke in the Tipi
There is one truism which says that there is no smoke without a
fire. On the other hand, however, there rarely is a fire without
smoke. Let's mention some elementary rules that prove to be true, from time to
time:
the smoke flaps should be adjusted to leave just a small opening between them
(about 20 cm), and oriented down the wind
smoke tends to stay in the upper 3 metres (more or less) of the
tent's inner space
smoke tends to stay above the liner
Combining the above mentioned rules, we can usually achieve satisfactory
results.
Rain
Closely woven waterproofed canvas and its relatively steep decline (cca 60
degrees) makes the cover impervious to rain. The
smoke flaps can be overlapped. What is a
problem, that's water running down the poles. Water drips from uneven and rough spots on the poles
(branch knots, bark, joints - in poles consisting of several
parts, etc.). It is therefore essential to peel, clean and smoothen the poles as well as possible
(or to "bridge" possible joints by rods or strings that would lead water over
them). The hat, however, seems to be the most reliable solution.
Our
products - teepee from CONDOR
- teepee sizing (diameter): 2,8 m / 3,5 m / 4,2 m / 4,9 m / 5,6 m / 6,3 m / 7,0 m
and above (agreement)
- liner for teepee.
If you are interested in our teepee, please contact us for further information.
© design & webmaster Petr Macháček 2002